Our Team

Cole Rademacher
Cal Poly Materials Engineering Class of 2022

Thomas Wolfe
Cal Poly Materials Engineering Class of 2021
Acknowledgements
- Dr. Blair London
- Dan Barelmann
- Bing Chao
- Cal Poly Materials Engineering Department
- TaylorMade Golf Inc.
Project Overview
Background
Worries of welding
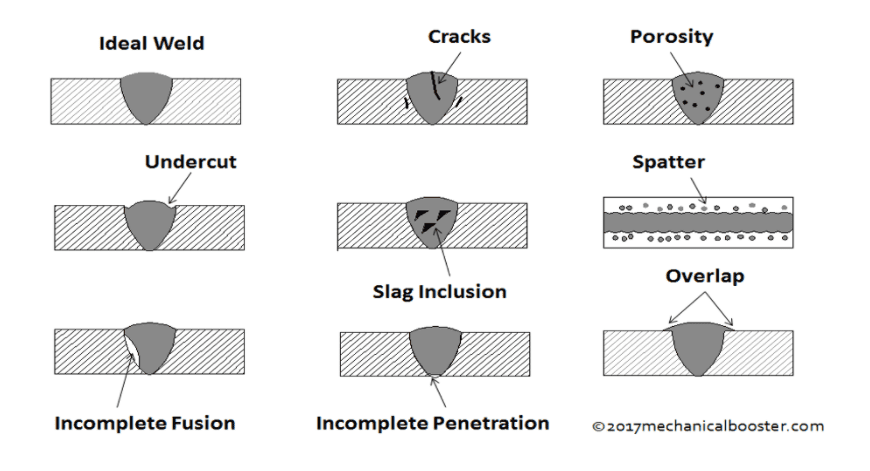
When looking at products with welded joints, it is important to keep in mind the possible defects that can arise during manufacturing. These defects include but are not limited to, incomplete penetration, porosity, and cracking. The resulting effects of having defects present in a weld are diminished mechanical properties and in some cases failure of the weldment. Proper welds with little to no defects are pertinent in the performance and overall life cycle of any welded product. Thus the welded joint of the golf club head designed by TaylorMade is allotted a large portion of our focus in this project.
Low Alloy Steels and tempering
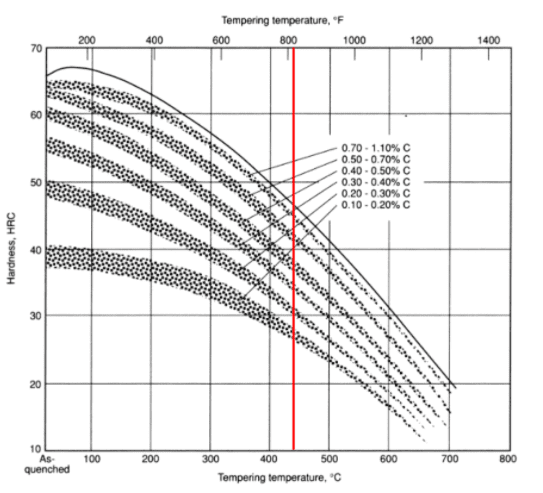
The two steels that were studied throughout this project are AISI 4140 and 8620. Each has a unique response to the tempering mechanism in relation to their chemical compositions.
AISI 4140 Steel:
- Contains more Carbon and Chromium
- Temper and hardenability
AISI 8620 Steel:
- Contains less Carbon and added nickel
- Toughness and Solution Strengthening
Problem Statement
This project looks to determine what tempering heat treatment parameters will optimize the mechanical properties of the club head and the AISI 4140/8620 dissimilar weld. Published literature surrounding this weld is minimal if any exists, though TaylorMade’s prior investigation of prematurely failed golf clubs discovered cracking within the weld’s heat-affected zone (HAZ). This project entails the use of heat-treatment technology, mechanical testing methods like welded-joint tensile testing, and metallographic characterization methods. The main safety issues that need to be addressed are related to COVID-19. Regarding lab work, it is important that one maintains six feet distance from other individuals and wears all required personal protective equipment (PPE). In addition to these new guidelines, all prior safety requirements still stand surrounding the safe operation of laboratory equipment; many of these will be outlined in the standard operating procedures (SOPs).
Experimental Design
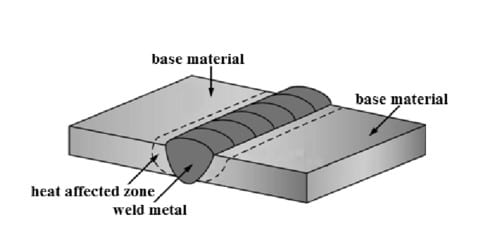
To replicate the welded joint of the club head two sheets of steel, one of 8620 and the other 4140, were welded together utilizing a process called plasma-arc welding. The filler material is 8620 as well. The diagram below displays a cross-sectional view of the welded specimens that were tested in this experiment.
In order to assess what the best heat treatment parameters are for optimized mechanical properties, four heat treatments with varying tempering temperatures were chosen to be tested. One of the heat treatments is the control which has a tempering temperature of 430℃ , while the other three have temperatures of 370℃, 400℃, and 460℃. All other heat treatment parameters are constant. The heat treatment process was performed on testing specimens by Taylormade Golf manufacturers, who subsequently mailed the specimens to the MATE department for testing.
Understanding the temper response of the two steels under our chosen heat treatment parameters required an experimental design containing tensile testing, metallography, and microhardness testing.
Tensile Testing
The tensile testing portion of this project is designed to identify the ductility and strength of the two materials individually and in combination across the specified tempering parameters. The individual mechanical properties will then be compared to that of the welded specimens to understand the combined materials performance and how it deviates from the individual materials performance.
A total of 60 tensile specimens were tested. 20 of these tensile samples were welded specimens while the other 40 were half 4140 base metal and half 8620 base metal. There were five samples per designated heat treatment for each base metal and the welded samples.
Metallography
Metallographic analysis was performed to analyze the microstructures of the two base metals and confirm that they are as expected after being subjected to various tempering temperatures. Metallography was subsequently performed on the welded specimens to search for possible inclusions or abnormalities in the weldment that might be the cause of failure.
To perform metallographic analysis on the samples, the tensile tested specimens were sectioned and mounted. Three samples of each base metal went into one mount, producing 8 base metal mounts. The welded mounts contained one weldment from each tempering temperature, making 4 mounts. A total of 12 mounts were produced and analyzed.
Microhardness testing
Microhardness testing was utilized to characterize the localized mechanical properties of each individual material as well as the welded specimens. This will provide an understanding of the hardness each material exhibits and how it responds to various tempering parameters. The same mounts used for metallographic analysis were subsequently subjected to microhardness testing.

This project is sponsored by TaylorMade Golf Inc.
Results
Tensile testing
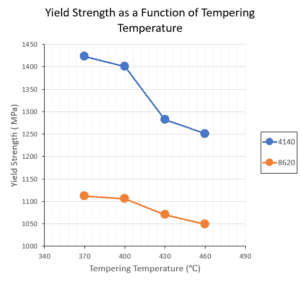
The tensile testing results of Yield Strength and Elongation were plotted as functions of tempering temperature in an effort to determine the most optimized heat treatment parameters for the golf-club head.
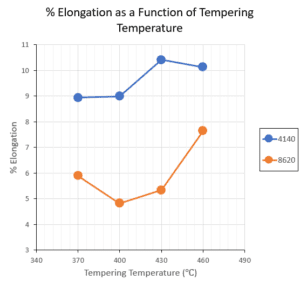
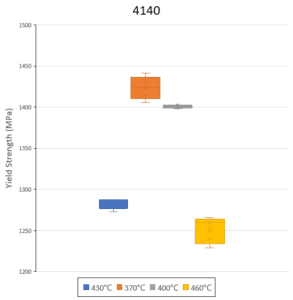
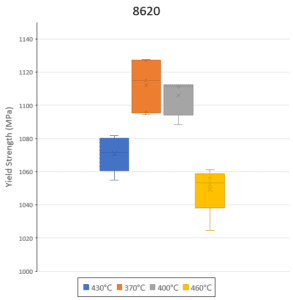
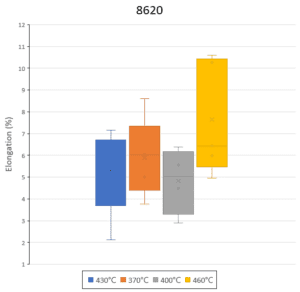
Instead of using a hypothesis test for a normal distribution, the descriptive statistics were computed using excel and the scatter was graphically analyzed using boxplots. The figures below show boxplots of the yield strength data, and it can quickly be deduced that the data has outliers, and its interquartile range is not uniform because of the small sample size.
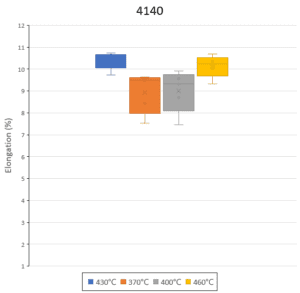
The elongation values from tensile testing exhibited significantly more scatter, but 4140 performed more consistently and with higher average elongation values for each tempering temperature. Because of the casting process 8620 is subject to, defects like porosity and inclusions (slag) can be present in higher amounts and cause variation in mechanical properties that could explain this scatter. These can be seen below.
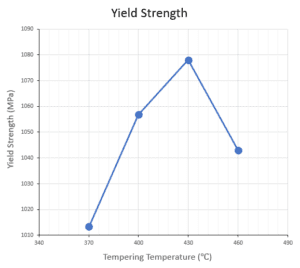
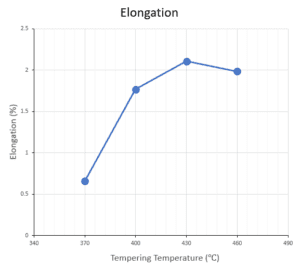
The tensile data for the welded specimens was also plotted as a function of tempering temperature, which can be seen in the graphs below.
metallography
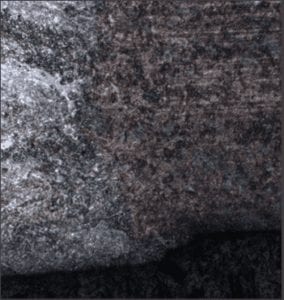
Micrographs of the base-metals were obtained for each tempering temperature. The welded specimens were also examined to confirm microstructures of the base metals and observe the deviation of the microstructure in the HAZ and the weldment. The figure below has an image on the left that shows 4140 while the image to the right displays 8620. The image at the bottom shows the weld interface between 8620 and 4140.


microhardness
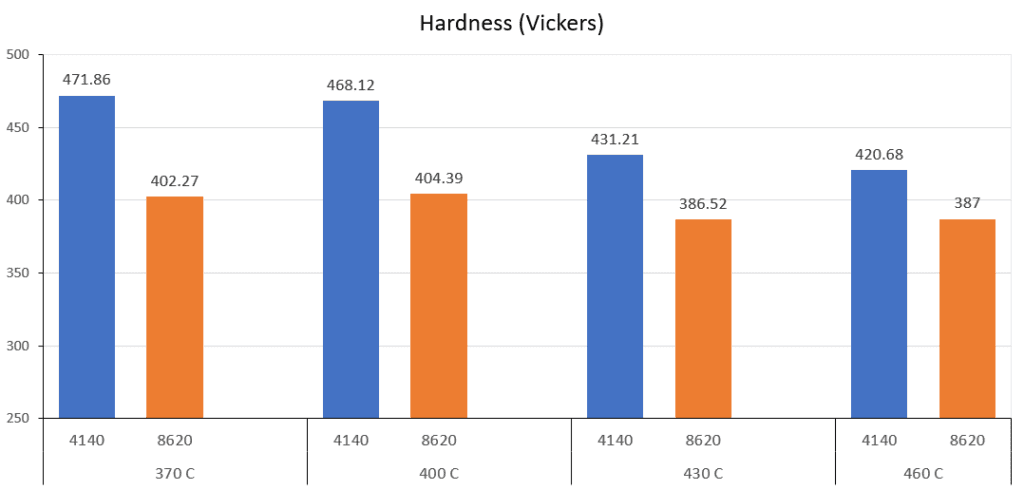
Microhardness data for the base metals was plotted in a bar chart to analyze the trend of each metal as a function of the tempering temperature.
Results Continued
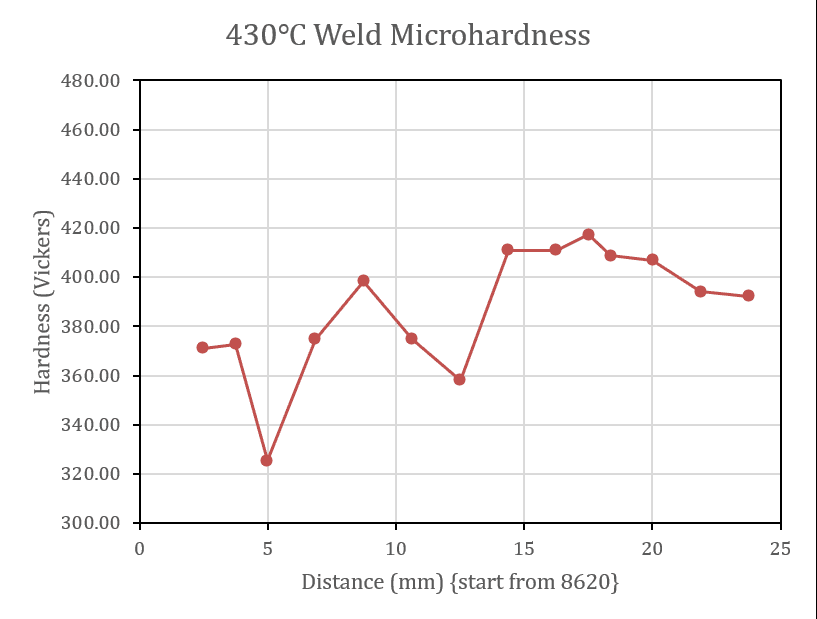
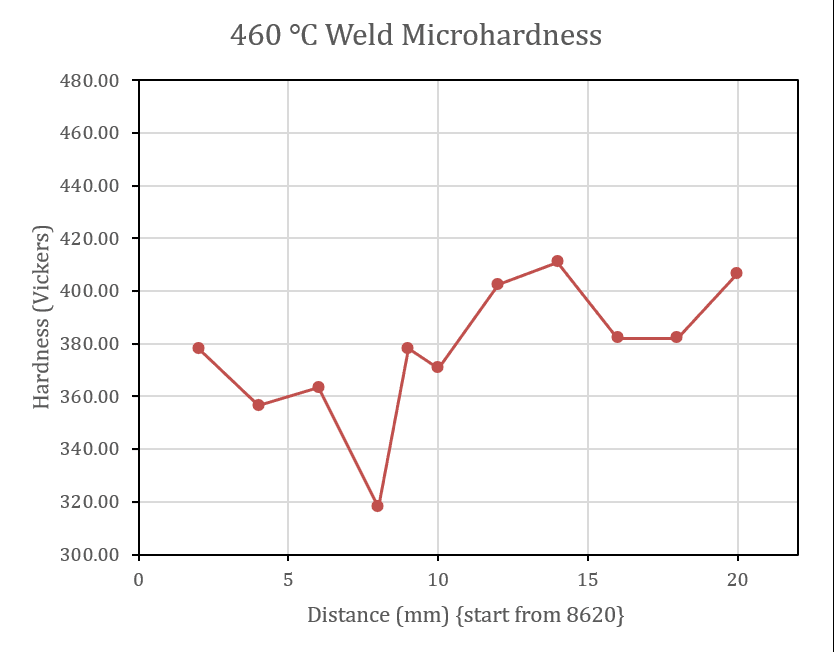
The welded specimen data was charted as a function of the distance across the weld to observe the change in microhardness associated with the microstructural gradient.
Discussion
When analyzing the tensile testing results for the base metals it was seen that the yield strength decreased with increasing tempering temperature, while the elongation increased with increasing tempering temperature. There is some slight variation in this trend when looking at the elongation, but this is assumed to be a result of the scatter in the data. The 8620 showed marginally more scatter in the tensile results than the 4140, most likely due to imperfections from the cast processing history. The casting process introduces defects such as porosity and slag.
The tensile data of the welded samples does not follow the same trends established in the base metal data. This outcome is linked to the microstructural gradient resulting from the dissimilar weld. This microstructural gradient causes the welded samples to exhibit differing mechanical properties throughout various regions of the sample, meaning that testing the welded specimen longitudinally will provide an elongation result that does not reflect solely the weldment. Despite the microstructural gradient, tensile testing these welded specimens did help to understand the strength of the weldment and identify which region of the welded samples would most commonly fail. Using all these observations in conjunction with the tensile data, it can be said that the 430℃ tempering group exhibited the best performing combination of mechanical properties, displaying high strength and ductility.
Metallographic analysis served to gain insight into the microstructural changes resulting from a variation of tempering temperature, while simultaneously pointing out any abnormalities that might be the cause of failure or decreased mechanical properties. The optical analysis of the lower tempering temperature specimens showed martensitic structures with small ferritic regions throughout. As the tempering temperature increases, the martensitic structure of both metals became less fine as the ferritic regions became more larger and more visible. There were clear indications between the two steels as a result of the processing history. The 4140 demonstrated directionality which makes sense as it the material is wrought processed, while the 8620 appeared to have a dendritic structure which results from the casting process. The welded samples followed the same trends as the base metals. The weldment of the samples displayed much larger grains of martensite while maintaining the basic structure of 8620 steel. Throughout the entirety of metallographic analysis, there were few abnormalities documented. No defects or inclusions were visible in any of the weldments of the welded samples, which is a good sign for the success of the welding process.
The microhardness data is as expected for both the base metals and the welded specimens. The base metal data displayed the trend of decreasing hardness as the tempering temperature increases. This trend follows the idea that higher tempering temperatures result in more dispersion of interstitial carbon atoms making a given steel more malleable, as described by the ASM handbooks. The 4140 steel exhibits higher hardness than the 8620 in general, which makes sense as 4140 is composed with a higher carbon content. Performing microhardness on the welded samples helped to understand the localized properties of the HAZ, the weldment, and the base metals when combined. It was predicted that the HAZ would display a lower hardness reading than both the base metals while the weldment is supposed to exhibit the same hardness as the base metals. When analyzing the resulting data, the HAZ demonstrates a drop in hardness from 40-60 Vickers. The weldments hardness lies in between the hardness of the base metals, which 8620 consistently has a lower hardness than the 4140. Overall, the microhardness data indicates that the base metals are responding to the heat treatment parameters as they are expected to, and that the combination of the two metals is within a reasonable range of variation from the base metal properties.
Conclusions
- Tempering at 430℃ resulted in the most appropriate combination of strength and ductility for the golf club head. Despite the scatter present in the tensile data, results from the tensile tests that were performed indicate that tempering at 430℃ provides the best performance overall.
- The results from the microhardness data are as expected. The data shows that the hardness of the base metals decreases as the tempering temperature increases. The welded specimens exhibited a drop in hardness ranging from 40-60 Vickers in the HAZ, which was anticipated based off preliminary research.
- Through metallographic analysis, the weldment of each sample displayed no significant defects or inclusions. This makes sense when considering that no welded tensile samples failed within the region of the weld, indicating that the weldment was not the source of failure for the samples.
Recommendations
The experimental results of all evaluations performed indicate that the tempering response displayed by the materials at 430℃ is most fitting for the application. The combination of mechanical properties optimizes the materials for the desired performance, and the welded tensile data shows the best results for strength and ductility in the 430℃ testing group. The metallographic analysis and microhardness testing both agree with this assessment, leading to the recommendation of keeping the current heat treatment parameters for optimized performance.

